In this case, perform the variant coding procedure again after confirming the cause in �DTC Fault State Information�.
DTC B1762 (ACU Coding Error) and B1102 (Battery Voltage Low) may be displayed simultaneously.
2) VIN Code entering screen
3) Variant coding’s proceeding screen-1
4) Variant coding’s proceeding screen-2
5) Variant coding is completed
1) This screen is opened when you try the variant coding again on the SRSCM that already has the variant coding performed.
2) If communication fails, the following screen will appear.
1) Initial ACU Variant Coding screen
2) ACU Coding Code entering screen
3) Screen of rechecking ACU Coding code’s entering
4) Variant coding’s proceeding screen-1
5) Variant coding’s proceeding screen-2
6) Variant coding is completed
1) This screen is opened when you try the variant coding again on the SRSCM that already has the variant coding performed.
Installation
1. Remove the ignition key from the vehicle. 2. Disconnect the battery negative cable and wait for at least three minutes before beginning work. 3. In .
Front Impact Sensor (FIS). Description and Operation
Description The front impact sensor (FIS) is installed in the Front End Module (FEM). They are remote sensors that detect acceleration due to a collision at its mounting location. The primary pur .
See also:
Rear Glass Defogger Printed Heater. Repair procedures Inspection Wrap tin foil around the end of the voltmeter test lead to prevent damaging the heater line. Apply finger pressure on the .
Moving the front seat forward and backward Push the control knob forward or backward to move the seat to the desired position. Release the knob and the seat will lock in that position. 1. Reclining Control Knob 2. Sliding and Height Adju .
2023 Hyundai Kia Engineering Mode, Dealer Mode, Engineer Mode, hidden Android menu and secret features of radio and navigation
How to show the secret menu Engineering Mode and Dealer Mode of Hyundai & Kia & Genesis infotainment system. Sonata, Azera, Grandeur, Veloster, i30, Elantra, Accent, i20, i10, Kona, Ioniq 6, Ioniq 5, Nexo, Santa Fe, Tucson, Palisade, Creta, Venue, Staria, H-1, H-100, Stargazer, i40, ix35, ix20. Soul, e-Soul, Seltos, Sportage, Sorento, Carnival, Telluride, Niro, EV6, EV9, Rio, Forte, K5, Stinger, Picanto, Morning, Ray, K3, K8, K9, Mohave, Bongo 3, Ceed, XCeed, ProCeed, Stonic, Sonet, Carens, Optima – DAB/FM AM radio
PROCEDURE MAY VARY FROM CAR TO CAR, NOT WORKING ON ALL SYSTEMS.DO NOT CHANGE ANY HIDDEN SETTING, DO NOT USE IT WHILE DRIVING. USE IT CAREFULLY AT YOUR OWN RISK AND COST!
Press the Setup button or choose All menus -> Settings
Choose Screensaver
Tap below Digital – Analogue – None options from left to right and back 7 times in total (tap below Digital, Analogue, None, Analogue, Digital, Analogue, None)
Press the Setup button or choose All menus -> Settings
Choose System Info
Tap 4 times on „Firmware“ or „Map“ and tap once on its version on the same line
Password is 1111 or 2998
Choose Send
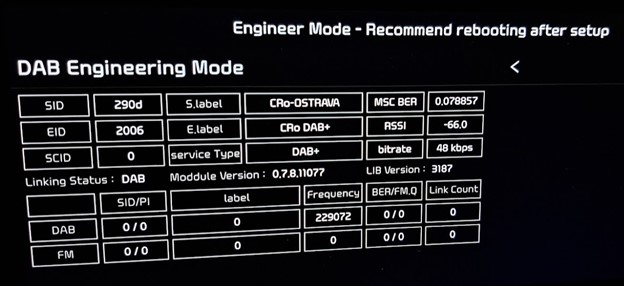
Choose Reception -> RDS -> RDS State (TestMode); choose DAB -> DAB State (DAB Engineering Mode)
OR
Press the Setup button or choose All menus -> Settings
Choose Screensaver
Tap below Digital – Analogue – None options from left to right and back 7 times in total (tap below Digital, Analogue, None, Analogue, Digital, Analogue, None)
Password is the current time or 2400
Choose Send
Choose All Applications
Choose 3rd Engineering Mode from the top (not the first Engineering Mode, not the DAB Engineering Mode)
OR
Press the Setup button or Choose All menus -> Settings
Choose System Info
Press the left knob (volume) to turn off the AV
In the dark part of the screen tap 4 times in the right bottom and once in the left bottom
OR
Press the Setup button or choose All menus -> Settings
Choose System info to see last 6 digits of the Software version (e.g. 221117)
Choose Update
Imagine the dark part of the screen is a phone dial with buttons 1 to 9 and the button 0 is in the left bottom of the whole screen
On the imaginary dial enter last 6 digits of the Software version (e.g. 221117)
Password is the current time + last 4 digits of the Software version (e.g. current time is 15:48 -> enter 15481177)
Choose Send
Engineering Mode (All in One Version, …)
Press the Setup button or choose All menus -> Settings
Choose System Info OR General
Tap 5 times left from the Update button and tap once right from the Update button or choose Storage and in the dark part of the screen tap 5 times in the left bottom and once in the right bottom
Password is 2900 or 2400 or 2702 or 2801 or 2603 or 2504 or 2405 or 2306 or 2207 or 2108 or 2009 or 2014
Choose OK
Choose Module Info
Choose FM -> Launch FM Engineering Mode; choose AM -> Launch AM Engineering Mode; choose DAB -> Launch DAB Engineering Mode
OR
Choose Radio -> FM
Set the volume to 2
Press the Setup button or choose All menus -> Settings
Choose General
Tap 5 times left from the Update button and tap once right from the Update button
Password is 2900 or 2400 or 2702 or 2801 or 2603 or 2504 or 2405 or 2306 or 2207 or 2108 or 2009 or 2014
Choose OK
Choose OK
Choose Module Info
Choose FM -> Launch FM Engineering Mode; choose AM -> Launch AM Engineering Mode; choose DAB -> Launch DAB Engineering Mode
Engineer Mode (Full Engineering Mode) – 2 knobs
Choose Radio
In a quick sequence set the volume using left knob to level 0, then to level 7 and press the right knob, then set the volume to level 3 and press the right knob, then set the volume to level 1 and press the right knob
Password is 0428 or 0652 or 500625 or 19500624 or 27021427 or 26031236
Choose Dynamics -> Radio
Engineer Mode (Full Engineering Mode) – 1 knob
Set the volume to 0
Press and hold the Star button
Choose VOL knob -> Browse media, map zoom in/out
Choose Home
On the steering wheel set the volume to level 7 and press the Volume knob, then set the volume to level 3 and press the Volume knob, then set the volume to level 1 and press the Volume knob
Press the Setup button or choose All menus -> Settings
Choose General -> System info -> Memory
In the dark part of the screen perform 6 taps in a quick sequence: Tap once below „Available…“ and the orange/grey line, tap 2 times below „Used for…“ and the orange/grey line, tap once above the orange/grey line between „Used for…“ and „Available…“, tap once below the middle of the orange/grey line and tap once below „Available…“ and the orange/grey line
Password is 1032580 + minutes of current time (e.g. current time is 15:48 -> input 103258048)
Choose OK
Dealer Mode (Diagnostics, Location, Media, Radio, Smart Pure Air Version Info/Update)
Press the Setup button or choose All menus -> Settings
Choose System Info
In a quick sequence set the volume using left knob to level 0, then to level 7 and press the right knob, then set the volume to level 3 and press the right knob, then set the volume to level 1 and press the right knob
Password is 2400
Choose Send
OR
Press the Setup button or choose All menus -> Settings
Choose General -> System info -> Version info/Update
In a quick sequence set the volume to level 7 and tap on the word „Update“ in the title Version info/Update, then set the volume to level 3 and tap on the word „Update“ in the title Version info/Update, then set the volume to level 1 and tap on the word „Update“ in the title Version info/Update
Password is 2400
Choose OK
DAB 1 – Overview (Freq, …)
Testmode on older systems – GEN 1.x, GEN 2.0
Go to the Radio mode
Press and hold the Setup button until a screen with device information appears
Touch and hold the screen in the middle until „Testmode“ screen appears
Choose OK
Password is 123456
Choose OK
Hidden service menu on older systems – A-200FDE etc.
Acc on, radio off
Press and hold preset keys „1“ and „4“ together for 6 seconds
Press the preset key „1“ 4 times (1111)
Press the preset key „4“ to display settings for RDS
WATCH RELATED VIDEOS:
PROCEDURE MAY VARY FROM CAR TO CAR, NOT WORKING ON ALL SYSTEMS.DO NOT CHANGE ANY HIDDEN SETTING, DO NOT USE IT WHILE DRIVING. USE IT CAREFULLY AT YOUR OWN RISK AND COST!
В общем мучениями удалось активировать TPMS и систему удержания полосы. Отключились адаптивные фары. Сейчас вернул все в зад, но сам факт того что это включается радует. Камера на лобовое стоит 1500$
Если у кого есть возможность помочь с кодингом, CLU кодом или может найти вин от машины по комплектации, откликнитесь!
Aquila
Просмотр профиля
Сообщения форума
Личное сообщение
View Gallery Uploads
V.I.P.Optimaclub ( 80952 )
1,622 622
Сообщение от Aquila
можно активировать. Проблема только в одном. Активация смарт круиз требует наличия контроля полосы. Проводка в крыше для камеры есть. Камера стоит 1560$. Помимо камеры требуется блок экстренного торможения(провода «барсук» тоже лежат) блок стоит 800 дохлых енотов. Ну и нужен смарт круиз- 1320$ и новая решетка на морду. Я посчитал, просто запчастей на 3500 зелени. Подожду пока набьют в америке этих машин, и можно поставить. Еще нужен новый блок переключателей, где кнопка удержания полосы.


 1,622
1,622  622
622