- Проблема с отображением информации о движении на новых ШГУ от 2020 года
- Тема: Как подключиться через Android Auto?
- Как подключиться через Android Auto?
- Тема: ШГУ 8″ без навигации QLE 2021
- вас поблагодарили
- 2023 Hyundai Kia Engineering Mode, Dealer Mode, Engineer Mode, hidden Android menu and secret features of radio and navigation
Проблема с отображением информации о движении на новых ШГУ от 2020 года
Добрый день. Недавно стал обладателем нового Sportage 2020 года в комплектации Luxe 2.0 6MT. Стоит обновленное ШГУ. Столкнулся с проблемой что не работает опция информация о движении, пишет «Воспользуйтесь после запуска мотора», но после запуска двигателя ситуация не меняется. В руководстве пользователя никакой информации на этот счет не нашел написано что должна работать. Где-то в интернете сталкивался с информацией что данная проблема присутствует на всех новых автомобилях. Никто не подскажет можно ли как-то решить данную проблему, или необходим обращаться к дилеру?Вложение 20203Вложение 20204
Пробовал по всякому, ничего не выходит, такое ощущение что в ШГУ не приходит информация с бортового компьютера, так же в независимости от того запущен двигатель или нет, ШГУ пишет «воспользуйтесь после запуска мотора»
Думаю что маловероятно — пробег уже около 1000 км. В руководстве пользователя такие условия не описаны.
@albion, позвоните ОД и спросите у него. А ещё во всех руководствах пишут, что в работу узлов могут быть внесены изменения, может это как раз этот случай? Возможно и ни у кого эта вкладка не работает.
У меня и нет такой вкладки.
П.С. Так и придётся открыть инструкцию на ШГУ и почитать, жаль, упаковано герметично)))
У меня и нет такой вкладки.
П.С. Так и придётся открыть инструкцию на ШГУ и почитать, жаль, упаковано герметично)))
В той инструкции, кроме Q-кода и пару страниц с тех.характеристиками, особо ни чего и нет.
Сейчас все инструкции по эксплуатации в эл.виде.
Открывать придется, по Q-коду скачаете инструкцию в формате WEB-версия
Тема: Как подключиться через Android Auto?

 Как подключиться через Android Auto?
Доброго времени суток всем!
Вчера купил жене KIA SPORTAGE 4, 2018 года выпуска, с мотором 2.0 MPI и в комплектации PRESTIGE.
Сразу прошу прощения если задаю глупый вопрос.
Вчера хотел подключить Samsung Galaxy S20+ к голове машины, но подключилось через блютус только Аудио — звонки, музыка телефонная книга и.т.д., а вот Android Auto ни как не заработал!? Т.е. Значок Android Auto на изображении магнитолы серый (не активный).
Что надо сделать и куда копать?
Ниже прикрепляю номер ПО и прошивки то, что стоит с момента покупки:
 0
0  6
6
Попробуйте подключить используя провод. Для беспроводного подключения нужно менять настройки в инженерном меню, и то не для всех моделей подходит трюк.
53 5
2018 год- там нет беспроводного подключения. Только кабель.
Либо покупать дополнительные девайсы. Типа AAwireless, Carlinkit A2A и подобные. Вставляется в USB ШГУ и служит шлюзом wi-Fi между ШГУ и смартфоном. Последним пользуюсь две недели. Ну такое себе. Часто отключается пару раз зависало ШГУ.
Тема: ШГУ 8″ без навигации QLE 2021
Здравствуйте, как определить какое шгу стоит и что для него есть из прошивок и фич?
Спортиссимо ( 1557 ) Регистрация 25.04.2019 Город Таганрог, РФ Premium QLe FL 2019, 8 AT 2.0 Crdi 4WD Сообщений 10,226
1,549 598
391 200
Спортиссимо ( 1557 ) Регистрация 25.04.2019 Город Таганрог, РФ Premium QLe FL 2019, 8 AT 2.0 Crdi 4WD Сообщений 10,226
1,549 598
![]() Сообщение от lar
Сообщение от lar 
0 0
![]() Сообщение от cdg
Сообщение от cdg
1 0
Вот техническая информация по ШГУ
головные устройства на новой платформе D-Audio Gen2 от производителя HYUNDAI MOBIS Сo.,Ltd. В отличии от предыдущей модификации D-Audio модели головных устройств, для всех автомобилей ,имеют 8-дюймовые мониторы c размером 176,40 х 99,36 cм. , 384000 пикселей TFT Active Matrix с разрешением 800х480. В частности на на модели 96160-Q5700DHV (KIA Seltos ) установлена матрица производителя Truly Semiconductors Ltd. TDA-WVGA0797F с ёмкостным сенсором. Обновлённая мультимедиа система с контроллером Telechips TCC8022X — серии Dolphin D, на базе ARM ® Cortex ® -A7 Quad. Dolphin работает с операционными системами Linux ® и QNX ™ и предоставляет передовую технологию в качестве работы с автомобильными системами безопасности и контроля движения.
Для подсистемы MCU применена флэш MX25L1633E ,16M-BIT [x 1/x 2/x 4] CMOS MXSMIO (SERIAL MULTI I/O) FLASH MEMORY.
Для мультимедиа eMMC MTFC4GACAJCN-4M IT Micron, оперативная память SDRAM — DDR3L две микросхемы по 2Gb MT41K256M8DA-107:K.
Применён новый GPS модуль- NEO-M8L-03A-12 и новый усилитель низкой частоты -TDF8546TH в корпусе SOT851-1. Система без навигации, но с возможностью подключения телефона (Apple CarPlay/Android Auto).
Головное устройство KIA SPORTAGE QLeN P/N:96160-Q5700DHV (M60F)
вас поблагодарили
Спортиссимо ( 1557 ) Регистрация 25.04.2019 Город Таганрог, РФ Premium QLe FL 2019, 8 AT 2.0 Crdi 4WD Сообщений 10,226
1,549 598
@Roman AS, на 4ПДА инфа обычно появляется быстрее, хотя бывают исключения, например, Крета клуб и ГУ Мобис. В вашем случае ГУ на линукс, но судя по 4ПДА его пока не вскрыли, в фаворе ГУ со встроенной навигацией.
2023 Hyundai Kia Engineering Mode, Dealer Mode, Engineer Mode, hidden Android menu and secret features of radio and navigation

How to show the secret menu Engineering Mode and Dealer Mode of Hyundai & Kia & Genesis infotainment system. Sonata, Azera, Grandeur, Veloster, i30, Elantra, Accent, i20, i10, Kona, Ioniq 6, Ioniq 5, Nexo, Santa Fe, Tucson, Palisade, Creta, Venue, Staria, H-1, H-100, Stargazer, i40, ix35, ix20. Soul, e-Soul, Seltos, Sportage, Sorento, Carnival, Telluride, Niro, EV6, EV9, Rio, Forte, K5, Stinger, Picanto, Morning, Ray, K3, K8, K9, Mohave, Bongo 3, Ceed, XCeed, ProCeed, Stonic, Sonet, Carens, Optima – DAB/FM AM radio

PROCEDURE MAY VARY FROM CAR TO CAR, NOT WORKING ON ALL SYSTEMS. DO NOT CHANGE ANY HIDDEN SETTING, DO NOT USE IT WHILE DRIVING. USE IT CAREFULLY AT YOUR OWN RISK AND COST!
Engineering Mode (CTS Test, ADB Connect Type, Android Setting, All Applications)
- Press the Setup button or choose All menus -> Settings
- Choose Screensaver
- Tap below Digital – Analogue – None options from left to right and back 7 times in total (tap below Digital, Analogue, None, Analogue, Digital, Analogue, None)
- Password is the current time or 2400
- Choose Send
Engineering Mode (System, Navigation, Reception, …)
- Press the Setup button or choose All menus -> Settings
- Choose System Info
- Tap 4 times on „Firmware“ or „Map“ and tap once on its version on the same line
- Password is 1111 or 2998
- Choose Send
- Choose Reception -> RDS -> RDS State (TestMode); choose DAB -> DAB State (DAB Engineering Mode)
- OR
- Press the Setup button or choose All menus -> Settings
- Choose Screensaver
- Tap below Digital – Analogue – None options from left to right and back 7 times in total (tap below Digital, Analogue, None, Analogue, Digital, Analogue, None)
- Password is the current time or 2400
- Choose Send
- Choose All Applications
- Choose 3rd Engineering Mode from the top (not the first Engineering Mode, not the DAB Engineering Mode)
- OR
- Press the Setup button or Choose All menus -> Settings
- Choose System Info
- Press the left knob (volume) to turn off the AV
- In the dark part of the screen tap 4 times in the right bottom and once in the left bottom
- OR
- Press the Setup button or choose All menus -> Settings
- Choose System info to see last 6 digits of the Software version (e.g. 221117)
- Choose Update
- Imagine the dark part of the screen is a phone dial with buttons 1 to 9 and the button 0 is in the left bottom of the whole screen
- On the imaginary dial enter last 6 digits of the Software version (e.g. 221117)
- Password is the current time + last 4 digits of the Software version (e.g. current time is 15:48 -> enter 15481177)
- Choose Send
Engineering Mode (All in One Version, …)
- Press the Setup button or choose All menus -> Settings
- Choose System Info OR General
- Tap 5 times left from the Update button and tap once right from the Update button or choose Storage and in the dark part of the screen tap 5 times in the left bottom and once in the right bottom
- Password is 2900 or 2400 or 2702 or 2801 or 2603 or 2504 or 2405 or 2306 or 2207 or 2108 or 2009 or 2014
- Choose OK
- Choose Module Info
- Choose FM -> Launch FM Engineering Mode; choose AM -> Launch AM Engineering Mode; choose DAB -> Launch DAB Engineering Mode
- OR
- Choose Radio -> FM
- Set the volume to 2
- Press the Setup button or choose All menus -> Settings
- Choose General
- Tap 5 times left from the Update button and tap once right from the Update button
- Password is 2900 or 2400 or 2702 or 2801 or 2603 or 2504 or 2405 or 2306 or 2207 or 2108 or 2009 or 2014
- Choose OK
- Choose OK
- Choose Module Info
- Choose FM -> Launch FM Engineering Mode; choose AM -> Launch AM Engineering Mode; choose DAB -> Launch DAB Engineering Mode
Engineer Mode (Full Engineering Mode) – 2 knobs
- Choose Radio
- In a quick sequence set the volume using left knob to level 0, then to level 7 and press the right knob, then set the volume to level 3 and press the right knob, then set the volume to level 1 and press the right knob
- Password is 0428 or 0652 or 500625 or 19500624 or 27021427 or 26031236
- Choose Dynamics -> Radio
Engineer Mode (Full Engineering Mode) – 1 knob
- Set the volume to 0
- Press and hold the Star button
- Choose VOL knob -> Browse media, map zoom in/out
- Choose Home
- On the steering wheel set the volume to level 7 and press the Volume knob, then set the volume to level 3 and press the Volume knob, then set the volume to level 1 and press the Volume knob
- Password is 0652
EngineerMode (System, Diagnostics, Location, Radio, Voice Recognition)
- Press the Setup button or choose All menus -> Settings
- Choose General -> System info -> Memory
- In the dark part of the screen perform 6 taps in a quick sequence: Tap once below „Available…“ and the orange/grey line, tap 2 times below „Used for…“ and the orange/grey line, tap once above the orange/grey line between „Used for…“ and „Available…“, tap once below the middle of the orange/grey line and tap once below „Available…“ and the orange/grey line
- Password is 1032580 + minutes of current time (e.g. current time is 15:48 -> input 103258048)
- Choose OK
Dealer Mode (Diagnostics, Location, Media, Radio, Smart Pure Air Version Info/Update)
- Press the Setup button or choose All menus -> Settings
- Choose System Info
- In a quick sequence set the volume using left knob to level 0, then to level 7 and press the right knob, then set the volume to level 3 and press the right knob, then set the volume to level 1 and press the right knob
- Password is 2400
- Choose Send
- OR
- Press the Setup button or choose All menus -> Settings
- Choose General -> System info -> Version info/Update
- In a quick sequence set the volume to level 7 and tap on the word „Update“ in the title Version info/Update, then set the volume to level 3 and tap on the word „Update“ in the title Version info/Update, then set the volume to level 1 and tap on the word „Update“ in the title Version info/Update
- Password is 2400
- Choose OK
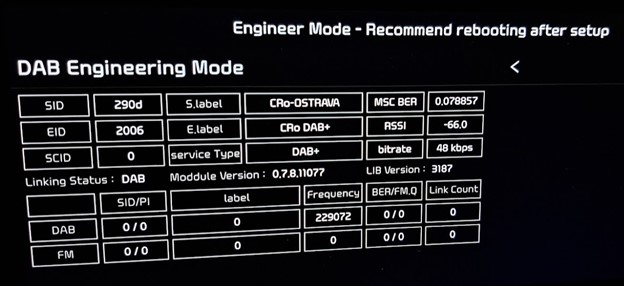
DAB 1 – Overview (Freq, …)
Testmode on older systems – GEN 1.x, GEN 2.0
- Go to the Radio mode
- Press and hold the Setup button until a screen with device information appears
- Touch and hold the screen in the middle until „Testmode“ screen appears
- Choose OK
- Password is 123456
- Choose OK
Hidden service menu on older systems – A-200FDE etc.
- Acc on, radio off
- Press and hold preset keys „1“ and „4“ together for 6 seconds
- Press the preset key „1“ 4 times (1111)
- Press the preset key „4“ to display settings for RDS
WATCH RELATED VIDEOS:
PROCEDURE MAY VARY FROM CAR TO CAR, NOT WORKING ON ALL SYSTEMS. DO NOT CHANGE ANY HIDDEN SETTING, DO NOT USE IT WHILE DRIVING. USE IT CAREFULLY AT YOUR OWN RISK AND COST!